Table of Contents
Intro
Now that the system boots and disks are spinning up and down without problems, the time has come to store something on them. There's a bunch of things that you can do to disks to make them more or less reliable, working faster or slower. I plan to try some of them and see how they impact performance.
The Terminology
The terminology is sometimes unclear, so it's good to start with agreeing on the names.
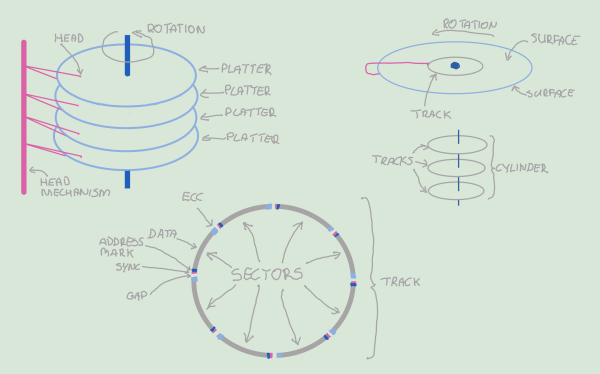
Long story short, you have these magnetic platters that spin at thousands of revolutions per minute. You have heads that can move closer or further from the center of the platter and read or write data. The part of the platter's surface that a head in a fixed position can access is a track. Since the heads don't move independently, a set of tracks they fly over their corresponding surfaces is called a cylinder. Each track is divided into sectors (or blocks) that are the smallest chunks of data that the disk can read or write atomically.
It usually takes several seconds to spin up a disk. Once it is spinning, reading the data involves:
- Seeking the cylinder, i.e., moving the head to the appropriate cylinder, takes 5-10 ms.
- Seeking the sector. The platters need to rotate to the relevant sector; 7200 RPMs for the IronWolf Pro disks, so about 8.5 ms in the worst case.
- Reading until the end of the sector.
- Running the ECC algorithm.
- Sending the data over the IO bus.
Historically, each sector could hold 512 bytes of the data payload. However, as the disk sizes grow, the 512-byte blocks constitute a lower and lower fraction of the overall disk surface. It poses challenges with error correction and metadata overhead. Therefore, the industry has come up with the Advanced Format. It increases the data payload size to 4 kilobytes and the ECC block's size to 100 bytes, leaving the header at 15 bytes. This increases the format efficiency from 88.7% (512/(512+65)) to 97.2% (4096/(4096+115)). The modern disks usually work in the compatibility mode, though, where the physical sector size is 4k. The 512 bytes long sector is emulated logically using the disk's internal DRAM as the staging area. Normally, the disk sector format is set during fabrication, but we will play with that later.
Another thing to pay attention to is whether the disk uses Conventional Magnetic Recording (CMR) or Shingled Magnetic Recording (SMR). They have different performance and capacity characteristics achieved by leveraging the fact that, due to physical limitations, the write head of a disk is significantly larger than the read head.
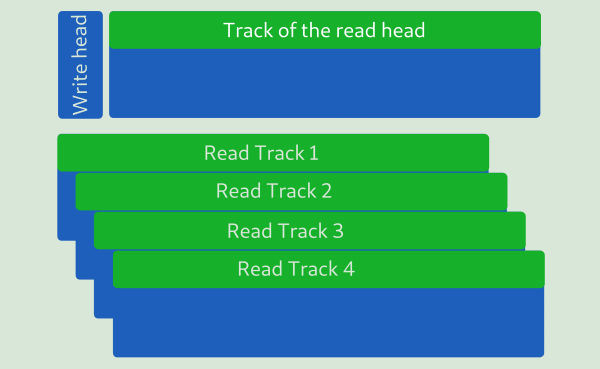
In CMR disks, the track's width is the same as the width of the write head. The write head will never overwrite any other track, and the read head has way more than enough magnetized material to read the data back reliably. In SMR disks, the track's width is the same as the width of the read head. It, of course, means that we don't use more platter surface than is needed to read the data back reliably, but it also means that the write head will overwrite multiple tracks. There's various trickery that can be employed to minimize the effect of that. You can read more about it here. In short, what is a single atomic write in a CMR disk may balloon into a long series of read and write operations with extensive usage of the onboard DRAM for caching in the SMR disks.
Using SMR technology comes with additional risks when using RAID. In these cases, you typically want to disable the volatile write caches to avoid data loss on a power cut. It is problematic when you have to keep a lot of transient state just to write things down in the proper order. The bottom line is: unless you know better, you want CMR.
Block Devices
Linux uses the abstraction of block devices to represent disks. They show up as
files in the filesystem under the /dev tree and allow you to access storage
devices as arrays of bytes. The kernel translates your read and write requests
to SCSI commands or whatever else is needed transparently. Furthermore, Linux
provides the functionality to pool and stack these devices together in really
cool ways. Each layer or grouping adds something on top of the other and usually
incurs some performance penalty.
But let's start from the beginning. As the first step, I reformatted the disks
to use 4k blocks. It is mainly to ensure that I get rid of any possible penalty
incurred by the block emulation logic in the hardware. The openSeaChest
package provides a command to do this:
]==> openSeaChest_FormatUnit --setSectorSize 4096 -d all --confirm this-will-erase-data
I have not noticed any read/write speed increase after performing this operation. It is likely because Linux is aware of the physical sector size and requests larger blocks regardless of the logical size.
I want the data on the disks safe, both from medium corruption and from tampering. The ECC block in each sector takes care of media corruption to a certain extent. The information is scarce, but the IronWolf drives use a 100-bit wide Reed-Solomon error correction scheme as far as I could figure out. There's a limit to what it can detect, and it does not provide any protection from willful tampering.
To solve this problem, I have played a bit with the dm-integrity module. It allows you to build a virtual block device on top of a disk and store additional integrity-related metadata for each sector. I have tried both CRC32 checksums for each block as well as SHA256 HMAC signatures. Both were very slow, though. The reason for the slowness is that the sector format of the disks does not allow for this information to be stored together with other sector metadata. It means that additional reads need to be performed to get the checksums or signatures from the device. It also takes some time to complete the verification of the data payload. Using the HMAC scheme shaves off some 100GB off the 14TB disks, so that's also not good. Given the performance and space penalties, I decided not to add the integrity layer after all and rely solely on the built-in protections of the disks.
I want to use full-disk encryption to make the devices locked and unusable when
powered off, as described in this excellent blog post. The Linux kernel
comes with the dm-crypt module. It allows you to build a virtual block
device on top of another one such that all the data sent to the underlying block
device is encrypted, but the data read from and written to the virtual device is
not. You can choose between a wide variety of ciphers, and I went for the
default AES-XTX-PLAIN64 because it makes the exact tradeoffs that I want.
Namely, it makes the penguins temporal, not spatial. (haha, I
stole a crypto joke ;) The command to create a dm-crypt device is:
]==> cryptsetup --sector-size 4096 luksFormat /dev/sda
I change the sector size because I re-formated the disk. You can then open it either "by hand:"
]==> cryptsetup open /dev/sda crypt_sda
Or add it to /etc/crypttab and be prompted for the password at startup:
]==> cat /etc/crypttab
crypt_sda UUID=e219e58e-e95d-4dad-907c-72cf809a5772 none luks
crypt_sdb UUID=d0e409af-9ffd-4394-9116-129839b99870 none luks
crypt_sdc UUID=aa1e61f9-c638-43c1-902b-59766886bc02 none luks
crypt_sdd UUID=84468a96-f6c8-4ad8-af5b-117463fd895e none luks
There are complaints on the Internet about dm-crypt being slow in some cases.
The good people at CloudFlare have a great blog post and a USENIX
presentation about the problem. What they observed is mainly
related to the fact that they use RAM disks for physical storage. For my
spinning disk setup, the Linux defaults worked better than what they propose.
All their work seems to have been upstreamed in the kernel that I used: a
vanilla 5.12.
Another possible improvement could be using RockChip's crypto engine that, according to the documentation, supports all the goodies we need. However, I found that the Linux device tree does not expose this engine for RK3399, and the driver for it for other flavors of the chip does not support the XTS mode as of kernel 5.12. I was not much interested in implementing it myself at this time, so I left the issue to rest. Perhaps I will revisit at some point.
Finally, I want to protect from a single disk failure and still keep decent performance. In theory, most of my applications will use single-threaded long reads and writes. Therefore, I should go for byte-level RAID3, but it seemed somewhat esoteric, and the required spindle synchronization can only be implemented by specialized hardware, so that's a no-go. I ended up with RAID5 using 4k blocks to optimize for large reads. To build the array, you need to run:
]==> mdadm --create --verbose /dev/md0 --level=5 --raid-devices=4 --chunk=4 \
    /dev/mapper/crypt_sda /dev/mapper/crypt_sdb \
    /dev/mapper/crypt_sdc /dev/mapper/crypt_sdd
]==> mdadm --detail --scan >> /etc/mdadm/mdadm.conf
The array takes a long time to create and the progress is reported in
/proc/mdstat. It actually is available immediately, but the performance will
be degraded until the array building finishes, so you probably want to wait with
your tests and benchmarks.
Benchmarks
I have run a bunch of benchmarks to test the folk wisdom of the Internet. The graphs below present the use-cases that I found the most relevant.
The abbreviations have the following meaning:
wr-seq: sequential write with disk's write cache enabledwr-rnd: random write with disk's write cache enabledwr-seq-nc: sequential write with disk's write cache disabledwr-rnd-nc: random write with disk's write cache disabledrd-seq: sequential readrd-rnd: random read
Each test involves processing 100GB worth of 1M blocks in a single thread per block device. I have put the benchmark program here.
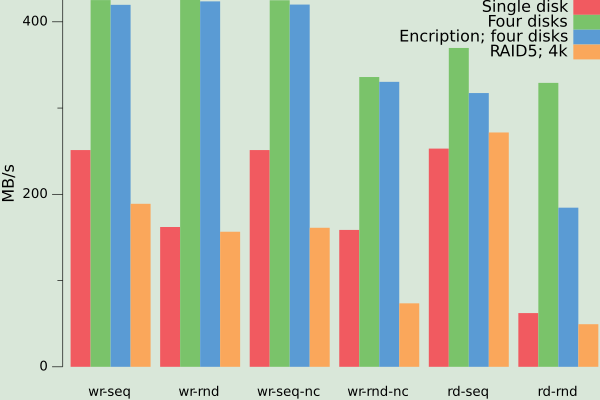
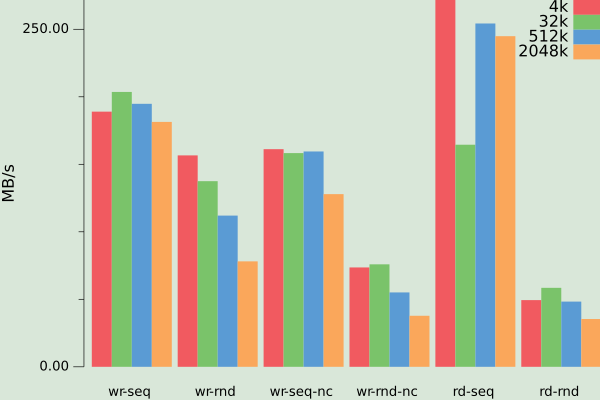
People have reported that the PCIe block of RK3399 can sustain up to 540MB/s writes and 1.3GB/s reads when talking to an NVMe device. Maximum I could get out of four disks oscillated around 400MB/s for sequential reads and writes, with reads being somewhat slower. Writing and reading randomly incurred about a 25% penalty. The performance of a single disk varied from a third to two-thirds of the performance of four disks in most cases except random reads, where it was about 25% of four disks. It must be that the SATA controller used in the NanoPi add-on board has bandwidth limitations.
Interestingly, the performance of the crypto system seems to be I/O bound except for random reads. I have not investigated further because that's unlikely to be a problem for my use cases. Furthermore, using RAID5 brings the performance down back roughly to the level of a single disk. These numbers are in the ballpark of what I would have expected (except for the random reads) given the apparent bandwidth limitations of the SATA controller. I don't think that will be a real issue in my use case, though. 4k chunks worked the best on average from all the sizes I tried.
The File System
We finally ended up with this huge block device at /dev/md0 that pools the
disks together into the RAID5 array, but it's of little use without a filesystem
that you can mount. I will not go crazy here and stay with EXT4. To operate
optimally, it needs to be aware of the layout of the underlying RAID array:
]==> mkfs.ext4 -b 4096 -E lazy_itable_init=0,lazy_journal_init=0,stride=1,stripe-width=3 /dev/md0
-bis the block size which, coincidentally, is the same as the RAID chunk sizestrideis the chunk size divided by the block size,1in this casestripe-widthis the number of data (non-parity) disks times thestridelazy_itable_initandlazy_journal_initsettings disable lazy initialization of the inode table and the journal inode, respectively; it makesmkfsslower, but no background data traffic will later mess with your benchmarks and make you wonder why the disks keep spinning even though there should be no data traffic involving them
Encountered Issues
Setting all this up has not exactly been smooth sailing. The hardware has failed during my tests, and I had to rebuild the RAID array. One failure was due to power issues mentioned in the earlier post: one of the disks did not spin up on time due to undercurrent, and the OS declared it missing. Another disk had to be replaced because of a weird power saving issue that I mention later in this paragraph. Below is a brief cheat sheet, primarily for my future reference.
Remove drives from the array that are no more connected to the system:
]==> mdadm /dev/md0 -r detached
Remove a drive from the array:
]==> mdadm /dev/md0 --fail /dev/sdc
]==> mdadm /dev/md0 --remove /dev/sdc
Force the array assembly with three out of four disks:
]==> mdadm --assemble --run /dev/md0 /dev/sda /dev/sdb /dev/sdd
Add a disk to the array:
]==> mdadm --add /dev/md0 /dev/sdc
I have discovered a strange issue during my random write benchmarks. It seems
that the IronWolf disks implement optimizations where they sequentially write
random physical sectors while preserving the correct ordering at the logical
level. It also appears that they then do some sort of low-priority
"defragmentation" in the background to restore the logical order on the physical
level. Weirdly enough, this prevents the disks from going into power-saving
mode, and they keep making noise. I contacted Seagate support over this issue
multiple times, but they have been worse than useless. Fortunately, I have
discovered by random experimentation and informed guessing that wiping the disks
with the appropriate openSeaChest command fixes the problem:
]==> openSeaChest_Erase --performQuickestErase -d all --confirm this-will-erase-data
Conclusion
I have left plenty of stones unturned. There are for sure plenty of not so well hidden optimizations and easy fixes under them. Things work well enough for me, though, and I am not that much interested in digging any deeper.