tldr: It works well and feels no different from a regular SSH session. However, the login process takes about 30 seconds because running a Diffie-Hellman key exchange on such an underpowered device is slow. The code is here.
Intro
As evident from other posts on this blog, I run a couple of single-board computers that serve some self-hosted web apps. These computers run Linux,which I try to keep up to date, and use full-disk encryption, which requires entering a passphrase on boot. I grew tired of having to run with a UART dongle to my TV shelf (which serves as a mini datacenter) whenever I wanted to reboot one of these machines, so I decided to make their UARTs accessible over SSH.
I could have used another Linux board for this purpose, which would have undoubtedly been much faster, but I wanted to learn to program Pico. Also, when I first searched for solutions, some random people on the Internet claimed that it's not possible to run an SSH server on a Pico, and I felt an urge to prove them wrong :)
This post gathers notes on interesting things I learned along the way.
Hardware
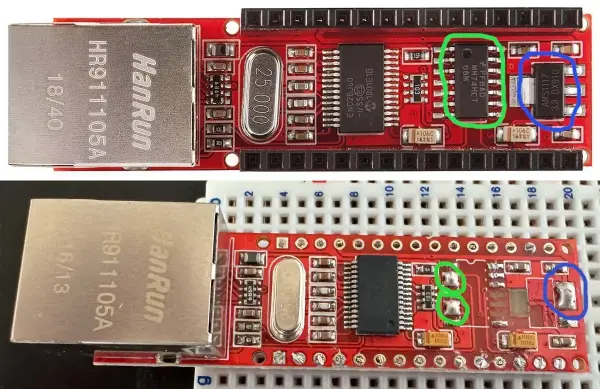
The first and most obvious thing to do is to figure out how to connect a Pico to the Internet. I already had an A-Z Delivery Ethernet shield for Arduino Nano lying around, and I really didn't want to buy a new one. Even though the ENC28j60 chip powering this shield is designed to operate at 3.3V, as Pico does, the shield itself is meant for Arduino and uses 5V signals. Therefore, it needed to be tweaked slightly. Some components had to be removed, and some contacts had to be shorted to make it work with Pico. These components are the regulator (marked blue), which drops the input voltage to 3.3V, and the AND gate (marked green), which raises the voltage of the MOSI and interrupt output signals back to 5V. The removed components and the shorted contacts are also marked on the picture below.
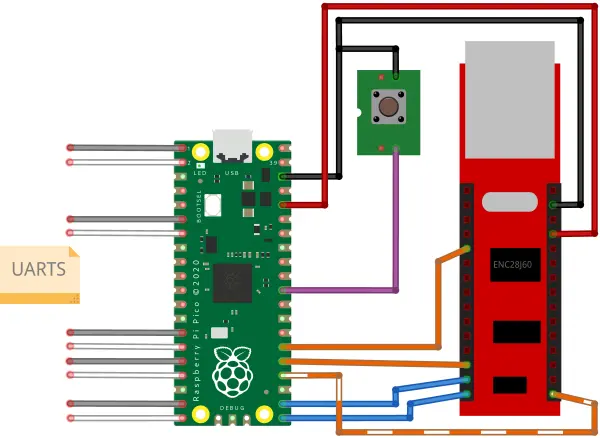
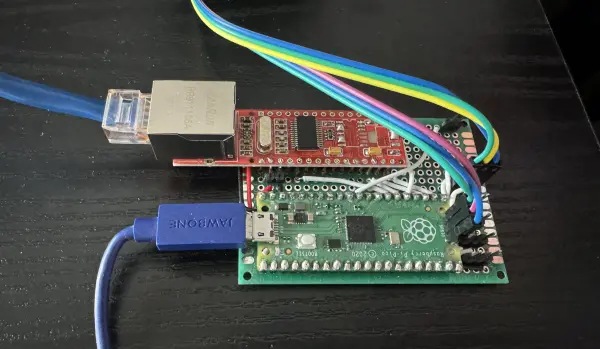
I used the first-generation Pico for this project. The contacts on the left connect to UARTs, and the contacts on the right interface with the Ethernet shield. I also added a reset button that connects the RUN signal to ground.
Pico's PIOs driving Ethernet
There are a bunch of packages out there that let you drive the ENC28j60 NIC from Pico. However, all of the ones I could find were doing blocking SPI ops, not only for the initial config but also for frame download and upload. That's unacceptable if you want to write a responsive server that does crypto and a whole lot of other things in the background, so I wrote my own driver.
Pico has this cool PIO mechanism (see Chapter 3 of the datasheet) that allows you to bit-bang magic on GPIOs. Here are some lectures that describe it in more detail. It's really great. People even managed to drive VGA displays with it. I used it to push and fetch 255-byte-long commands through SPI. It comes in very handy when you want to upload and download large frames. The commands could not have been any longer because the record length for PIO can only be set globally, so if you want to deal with bytes, you have only a single byte to hold the RX and TX length. I used DMA chaining to do scatter-gather IO on command queues, so the command size limit ended up being a non-issue in practice.
OS and network stack
I did not want to organize everything around event loops, because this sort of design becomes very annoying very quickly. Therefore, I went with FreeRTOS for multitasking. It already supports Pico and enables both of its Cortex-M cores, so the integration was relatively painless. I had to write some glue code to integrate the Pico heap allotacor with FreeRTOS's Heap5, but it was a minor hassle.
FreeRTOS' TCP stack also worked out of the box, except for deriving stable IPv6 addresses from router advertisements. It is understandable, though. You rarely have tiny embedded devices run as servers, so having randomized addresses works fine. It was not very hard to implement EUI64 address derivation, but as of the time of writing, it still has to be merged.
Running an SSH server
There are a couple of options for running SSH with embedded systems. After a rapid review, I decided to go for WolfSSH. The decision to do so was mainly driven by the fact that they had posted benchmarks for the underlying crypto library on the Pico, and the project appeared to be very well maintained.
It took me quite some time to parse their demo server and write working socket wrappers for the FreeRTOS TCP stack. They should invest more time in creating more concise examples, especially since this is actually a commercial project. Things worked out of the box except for one small issue that I had to fix. The server's overall operation is pretty smooth, except for the initial key exchange during login. It takes about 30 seconds. It still works way better than I had initially expected, given how vastly underpowered the device is for the task. As far as RAM is concerned, memory usage for a session peaks during key exchange at about 50 kB and drops significantly afterwards.
I also ended up learning more than I ever wanted to know about how OpenSSH private keys are encoded.
You can't exactly run Bash as a backend for SSH on Pico, so I ended up using Microshell with a bunch of custom commands and a configuration filesystem. The configuration filesystem allows you to set the baud rate for each UART and assign it a name that can be used as an SSH login name.
Pico quirks
The only thing that gave me a headache was storing the configuration to flash
at runtime. It is because typical Pico workflows place most of the code in flash
and execute it in place (XIP) using a cache. Because of that, when you want to
erase a block of flash and write a new config to it, you have to make sure that
the core doing the writing executes code from RAM, and the second core does not
execute any instruction from flash/cache either. The first condition is easily
achieved by using function attributes and marking the code to run from RAM. The
second condition, however, is a royal pain in the neck when you use a
multitasking RTOS. I ended up using a combination of semaphores and busy waiting
(see here), which was the only solution that worked somewhat reliably.
I later learned that PicoSDK provides functions such as
multicore_lockout_victim_init() and multicore_lockout_start_blocking(), but
I ran out of steam for the project to test them. In particular, I didn't want to
test whether it has any adverse interactions with the RTOS.
Summary
The project has been a whole lot of fun, but it took me about a year and a half to complete. It is mainly because the copious amount of free time I had thought I would have for it turned out to be way less copious in practice. Pico is great, and the PIO thing blew my mind. It's so simple, yet so elegant. There's also a WiFi-enabled version of Pico, and I want to learn more about how WiFi stacks work, so I will probably invent another niche toy to play with wireless as one of my follow-up projects.